DIY Leg Wax: A Step-by-Step Guide To Smooth Legs At Home
Smooth, hair-free legs have become a staple of modern beauty routines. DIY leg waxing is a cost-effective and convenient alternative to professional salon treatments, allowing you to achieve salon-quality results from the comfort of your home. Whether you're a beginner or looking to refine your technique, this comprehensive guide will walk you through everything you need to know about DIY leg waxing.
Waxing at home can save you both time and money while still delivering effective results. However, it requires proper preparation, the right tools, and a thorough understanding of the process. This article will provide you with expert tips, step-by-step instructions, and essential safety precautions to ensure a successful and pain-free experience.
Our goal is to equip you with the knowledge and confidence to perform DIY leg waxing safely and effectively. By following the guidelines outlined here, you can achieve smooth, hair-free legs without the need for expensive salon visits.
- Skunk Stripe Hair
- Bergdorf Goodman Women S Shoes
- Why Do Men Like Women On Top
- Blake Lively Hair Color
- Schiaparelli Kylie Jenner
Why Choose DIY Leg Wax Over Other Hair Removal Methods?
When it comes to hair removal, there are numerous options available, including shaving, depilatory creams, and laser treatments. However, DIY leg waxing stands out due to its long-lasting results and precision. Unlike shaving, which only cuts hair at the surface, waxing removes hair from the root, resulting in smoother skin and fewer ingrown hairs.
Additionally, DIY leg waxing offers several advantages:
- Affordable: Waxing kits are significantly cheaper than repeated salon visits.
- Convenient: You can perform the procedure at your own pace and schedule.
- Customizable: You have full control over the process and can target specific areas.
- Long-Lasting Results: Hair typically takes 3-4 weeks to regrow after waxing.
What You Need for DIY Leg Wax
Before diving into the process, it's essential to gather all the necessary tools and materials. Having the right equipment ensures a smoother and more effective waxing experience. Here's a list of items you'll need:
- Clarks Dress Shoes For Plantar Fasciitis
- Elegant Simple Rhinestone Nail Designs
- Vivaia Discount
- Slick Middle Part
- Women S Perfume For Summer
Essential Tools and Materials
- Waxing kit (strip wax or hard wax)
- Wax applicator sticks
- Cotton strips or muslin cloths (for strip wax)
- Pre-wax cleanser
- Post-wax soothing lotion or oil
- Cotton pads or balls
- Warm water
Optional items include:
- Exfoliating mitt or scrub
- Moisturizer (non-oil-based)
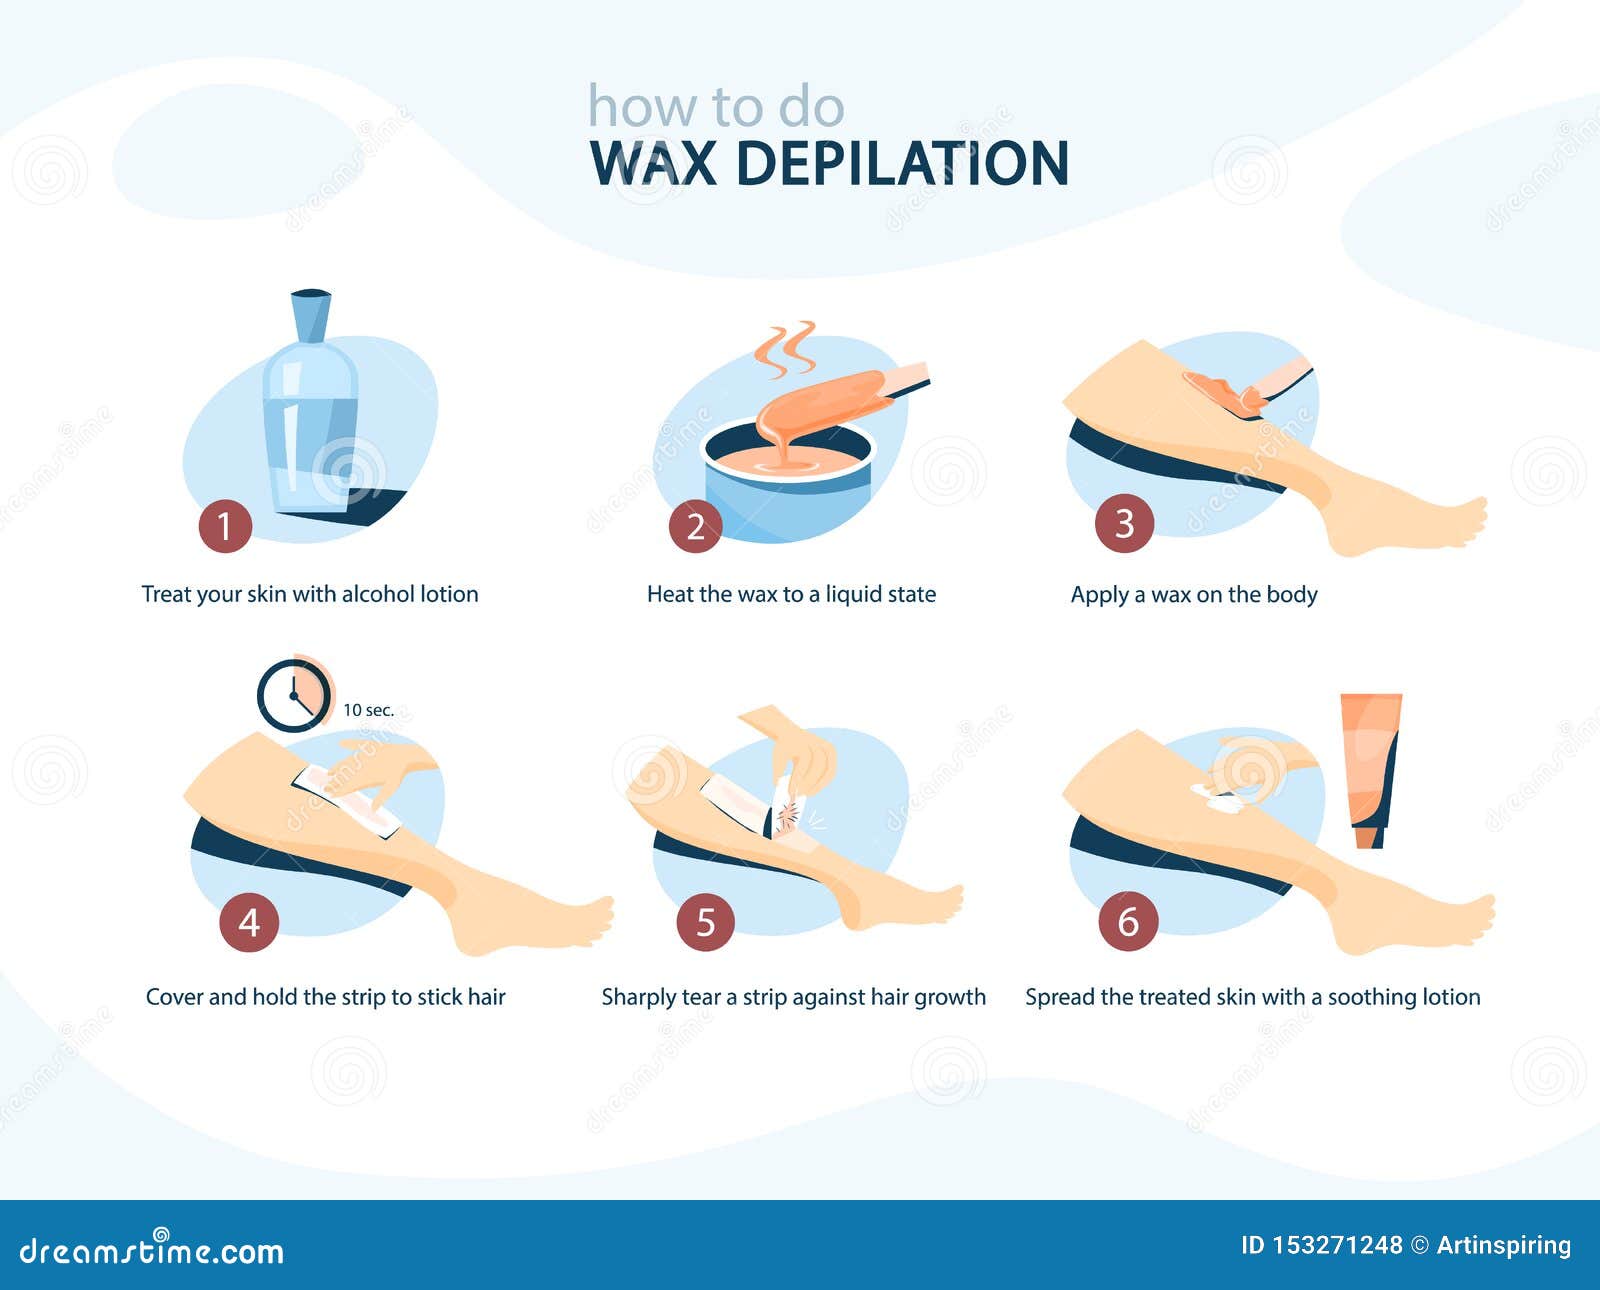
Preparing Your Legs for Waxing
Proper preparation is key to a successful DIY leg waxing experience. Follow these steps to ensure your skin is ready for the process:
Step 1: Exfoliate
Exfoliating your legs before waxing removes dead skin cells and reduces the risk of ingrown hairs. Use a gentle exfoliating mitt or scrub and focus on the areas you plan to wax.
Step 2: Cleanse
Wash your legs with warm water and a pre-wax cleanser to remove oils and dirt. Pat your skin dry with a clean towel.
Step 3: Test the Wax
Before applying wax to your entire leg, test a small patch of skin to ensure you're not allergic to the product. Wait 24 hours to check for any adverse reactions.
Step-by-Step Guide to DIY Leg Waxing
Now that you're prepared, it's time to dive into the actual waxing process. Follow these steps for a smooth and efficient experience:
Step 1: Heat the Wax
If you're using a microwaveable wax, heat it in short intervals, stirring between each cycle. For wax warmers, follow the manufacturer's instructions for optimal temperature.
Step 2: Apply the Wax
Using an applicator stick, spread a thin layer of wax in the direction of hair growth. Ensure the wax adheres evenly to the skin.
Step 3: Remove the Hair
For strip wax, place a cotton strip over the wax and press firmly. Pull the strip in one quick motion against the direction of hair growth. For hard wax, allow the wax to cool slightly before peeling it off in one swift motion.
Step 4: Repeat
Continue applying and removing wax in small sections until the desired area is hair-free.
Post-Waxing Care
Proper aftercare is crucial to prevent irritation and maintain smooth skin. Follow these tips for the best results:
Tip 1: Soothe the Skin
Apply a post-wax soothing lotion or oil to calm the skin and reduce redness. Avoid using products containing alcohol or fragrances, as they may irritate sensitive skin.
Tip 2: Avoid Sun Exposure
Stay out of the sun for at least 24 hours after waxing. UV rays can irritate freshly waxed skin and cause discoloration.
Tip 3: Moisturize Regularly
Use a non-oil-based moisturizer daily to keep your skin hydrated and reduce the risk of ingrown hairs.
Common Mistakes to Avoid
While DIY leg waxing is relatively straightforward, there are common mistakes that can lead to discomfort or poor results. Here are a few to watch out for:
- Waxing hair that's too short or too long
- Applying wax too thickly
- Pulling the strip too slowly or at the wrong angle
- Not testing the wax temperature before application
Safety Precautions and Considerations
Safety should always be a priority when performing DIY leg waxing. Follow these guidelines to minimize risks:
Precaution 1: Know Your Skin Type
Sensitive or allergy-prone skin may require special care or alternative methods. Consult with a dermatologist if you're unsure about waxing suitability.
Precaution 2: Follow Product Instructions
Always read and follow the instructions provided with your waxing kit. Different products may have specific requirements for optimal results.
DIY Leg Wax vs. Professional Waxing: Which Is Better?
Both DIY leg waxing and professional treatments have their advantages and disadvantages. Consider the following factors when deciding which option is right for you:
- Cost: DIY waxing is more affordable in the long run.
- Convenience: DIY allows you to wax whenever it suits you.
- Expertise: Professionals may offer more advanced techniques and products.
Conclusion: Achieve Salon-Quality Results at Home
DIY leg waxing is an excellent way to achieve smooth, hair-free legs without the need for expensive salon visits. By following the steps outlined in this guide, you can perform the procedure safely and effectively. Remember to prepare your skin properly, use quality products, and take care of your skin afterward for the best results.
We encourage you to share your experience with DIY leg waxing in the comments below. Have you tried any specific waxing kits or techniques that worked well for you? Don't forget to explore our other articles for more beauty tips and tricks. Happy waxing!
Table of Contents
- Why Choose DIY Leg Wax Over Other Hair Removal Methods?
- What You Need for DIY Leg Wax
- Preparing Your Legs for Waxing
- Step-by-Step Guide to DIY Leg Waxing
- Post-Waxing Care
- Common Mistakes to Avoid
- Safety Precautions and Considerations
- DIY Leg Wax vs. Professional Waxing: Which Is Better?
- Conclusion: Achieve Salon-Quality Results at Home
References:
- Mayo Clinic - Skin Care Tips
- WebMD - Hair Removal Methods
- Cosmetic Dermatology - Waxing Safety Guidelines
- Blonde And Red
- Bridgerton Inspired Dresses
- Kitten Heel Pumps
- How To Wear A Beanie
- Braid Hairstyles For Straight Hair

Diy leg extension leg curl machine Artofit

10 DIY leg press machines — KAIZEN DIY GYM Leg press machine, Diy gym
Waxing Leg Instruction. Hair Removal with Wax Stock Vector
